记录一下折腾博客的过程,方便自己了解配置修改的情况。
Hexo 版本:6.3.0
Next 版本:8.14.1
安装 Nodejs、Git 自行前往对应官网安装
安装 Hexo 创建仓库 创建名为用户名.github.io的仓库
生成 SSH key 1 ssh-keygen -t rsa -C "注册 GitHub 的邮箱"
生成后打开C:\Users\windows用户名\.ssh\id_rsa.pub,复制公钥,在自己的 GitHub 账号添加 SSH key
测试绑定是否成功 本地生成博客内容
创建blog文件夹,在其下 Git Bash
访问localhost:4000即可
发布博客到互联网
修改站点配置文件
1 2 3 4 deploy: type: git repository: git@github.com:用户名/用户名.github.io.git branch: main
安装 hexo-deployer-git
1 npm install hexo-deployer-git --save
生成页面并上传
访问用户名.github.io即可
设置域名解析
在域名控制台添加 CNAME 解析到用户名.github.io
在blog/source文件夹下添加一个名为CNAME的文件(不带后缀),填入自己的域名,如example.com,然后上传到远程 GitHub 博客仓库,这样以后有文章更新时可以保证远程仓库一直有CNAME文件,使域名正常解析
前往远程 GitHub 博客仓库Settings-Pages-Custom domain添加自己的域名
安装与配置 next 主题 安装 next 主题 1 git clone https://github.com/next-theme/hexo-theme-next themes/next
基础配置 下文所有与配置文件相关的部分只展示修改或新增部分!
修改站点配置文件
1 2 3 4 5 theme: next title: quaintfox's blog author: quaintfox language: zh-CN url: https://quaintfox.com
修改主题配置文件,并把相应图片放在blog/themes/next/source/images文件夹下,有图床的可以用图床链接
1 2 3 4 5 6 7 8 9 10 11 12 13 14 15 16 17 18 19 20 21 22 23 24 25 26 27 28 29 30 31 32 33 34 35 36 37 38 39 40 41 42 43 44 45 46 47 48 49 scheme: Gemini favicon: small: /images/favicon-16x16.png medium: /images/favicon-32x32.png apple_touch_icon: /images/apple-touch-icon.png safari_pinned_tab: /images/avatar.svg creative_commons: license: by-sa post: true menu: home: / || fa fa-home tags: /tags/ || fa fa-tags archives: /archives/ || fa fa-archive avatar: url: /images/avatar.jpg rounded: true rotated: true social: GitHub: https://github.com/quaintfox || fab fa-github E-Mail: mailto:qf@quaintfox.com || fa fa-envelope tag_icon: true codeblock: theme: light: atom-one-light dark: atom-one-light copy_button: enable: true back2top: enable: true sidebar: true scrollpercent: true font: enable: true host: https://fonts.loli.net global: family: Noto Serif SC size: 0.9 pjax: true mediumzoom: true lazyload: true quicklink: enable: true home: true archive: true delay: true priority: true motion: enable: false busuanzi_count: enable: true
生成标签页面
生成标签页面
修改blog/source/tags/index.md,添加type: "tags"
1 2 3 title: tags date: 2023-01-08 11:27:57 type: "tags"
以后就可以在文章文件头添加标签了,如下
1 2 3 4 5 6 title: Hexo + GitHub 搭建个人博客 date: 2023-01-07 13:15:00 tags: - Hexo - Next - 博客
其他页面生成同理,记得在主题配置文件解除相关注释
Waline 评论系统
前往 Waline 官网 根据指引到 Vercel 进行 Waline 服务端部署
安装 @waline/hexo-next
1 npm install @waline/hexo-next
为了不使用魔法也能正常评论,我们需要有自己的域名解析到 Waline 服务端,可以在域名控制台给自己的博客域名添加二级域名,添加 CNAME 解析到cname-china.vercel-dns.com或添加 A 解析到76.223.126.88(也可以前往 Vercel All IP 自行挑选合适的节点),接着进入 Vercel 的 Waline 应用的控制台,在Settings-Domains里添加上文提到的二级域名,这样在主题配置文件添加配置后就可以正常评论了
主题配置文件添加配置
注意:serverURL 填写自己解析到 Waline 服务端的域名!
1 2 3 4 5 6 7 8 9 10 11 12 13 14 15 16 17 18 19 20 21 22 23 24 25 26 27 28 29 30 31 32 33 34 35 36 37 38 39 40 41 42 43 44 45 46 47 48 49 50 51 52 53 54 55 56 57 waline: enable: true serverURL: https://waline.vercel.app/ libUrl: https://npm.elemecdn.com/@waline/client@v2/dist/waline.js cssUrl: https://npm.elemecdn.com/@waline/client@v2/dist/waline.css commentCount: true pageview: false emoji: - https://npm.elemecdn.com/@waline/emojis@1.0.1/weibo - https://npm.elemecdn.com/@waline/emojis@1.0.1/alus - https://npm.elemecdn.com/@waline/emojis@1.0.1/bilibili - https://npm.elemecdn.com/@waline/emojis@1.0.1/qq - https://npm.elemecdn.com/@waline/emojis@1.0.1/tieba - https://npm.elemecdn.com/@waline/emojis@1.0.1/tw-emoji
在blog/source/_data文件夹下新建languages.yml并编辑
1 2 3 4 5 6 7 zh-CN: post: views: 阅读 comments: waline: 评论
配置完评论后及时到 Waline 服务端登录,以便管理评论
可选择开启评论邮件提醒功能, Waline 官网 有详细的说明
搜索功能
安装 hexo-generator-searchdb
1 npm install hexo-generator-searchdb
修改主题配置文件
1 2 local_search: enable: true
Canvas nest 背景动画
在blog/source/_data文件夹下新建footer.njk并编辑
1 <script color="0,255,255" opacity="1" zIndex="-1" count="70" src="https://cdn.staticfile.org/canvas-nest.js/1.0.1/canvas-nest.js" ></script>
修改主题配置文件
1 2 custom_file_path: footer: source/_data/footer.njk
MathJax
安装 hexo-filter-mathjax
1 npm install hexo-filter-mathjax
修改主题配置文件
1 2 3 math: mathjax: enable: true
此后可在文章文件开头添加参数mathjax: true以使用 MathJax
效果测试:
CDN 修改主题配置文件
1 2 3 vendors: plugins: custom custom_cdn_url: https://cdn.staticfile.org/${cdnjs_name}/${version}/${cdnjs_file}
字数统计 安装 hexo-word-counter
1 npm install hexo-word-counter
烟花动画
安装 next-theme/hexo-next-fireworks
1 npm install next-theme/hexo-next-fireworks
主题配置文件添加配置
1 2 fireworks: enable: true
由于烟花动画比较遮挡视线,已修改/blog/node_modules/hexo-next-fireworks/fireworks.js,更换为礼花动画
夜间模式
安装 hexo-next-darkmode
1 npm install hexo-next-darkmode --save
主题配置文件添加配置
1 2 3 4 5 6 7 8 9 10 11 12 13 14 15 16 17 darkmode_js: enable: true bottom: '64px' right: 'unset' left: '32px' time: '0.5s' mixColor: 'transparent' backgroundColor: 'transparent' buttonColorDark: '#100f2c' buttonColorLight: '#fff' isActivated: false saveInCookies: true label: '🌓' autoMatchOsTheme: true libUrl: https://npm.elemecdn.com/darkmode-js@1.5.7/lib/darkmode-js.min.js
运行时间 在/blog/themes/next/layout/_partials/footer.njk中添加
1 2 3 4 5 6 7 8 9 10 11 12 13 14 15 16 17 18 19 20 <div> <span id ="timeDate" > 载入天数...</span > <span id ="times" > 载入时分秒...</span > </div> <script > var now = new Date (); function createtime ( var grt= new Date ("01/07/2023 13:15:00" ); now.setTime (now.getTime ()+250 ); days = (now - grt ) / 1000 / 60 / 60 / 24 ; dnum = Math .floor (days); hours = (now - grt ) / 1000 / 60 / 60 - (24 * dnum); hnum = Math .floor (hours); if (String (hnum).length ==1 ){hnum = "0" + hnum;} minutes = (now - grt ) / 1000 /60 - (24 * 60 * dnum) - (60 * hnum); mnum = Math .floor (minutes); if (String (mnum).length ==1 ){mnum = "0" + mnum;} seconds = (now - grt ) / 1000 - (24 * 60 * 60 * dnum) - (60 * 60 * hnum) - (60 * mnum); snum = Math .round (seconds); if (String (snum).length ==1 ){snum = "0" + snum;} document .getElementById ("timeDate" ).innerHTML = "本站已安全运行 " +dnum+" 天 " ; document .getElementById ("times" ).innerHTML = hnum + " 小时 " + mnum + " 分 " + snum + " 秒" ; } setInterval ("createtime()" ,250 );</script >
站点地图
安装 hexo-generator-sitemap
1 npm install hexo-generator-sitemap --save
修改主题配置文件
1 2 menu: sitemap: /sitemap.xml || fa fa-sitemap
生成sitemap.xml
此时可以在blog/public文件夹下看到sitemap.xml
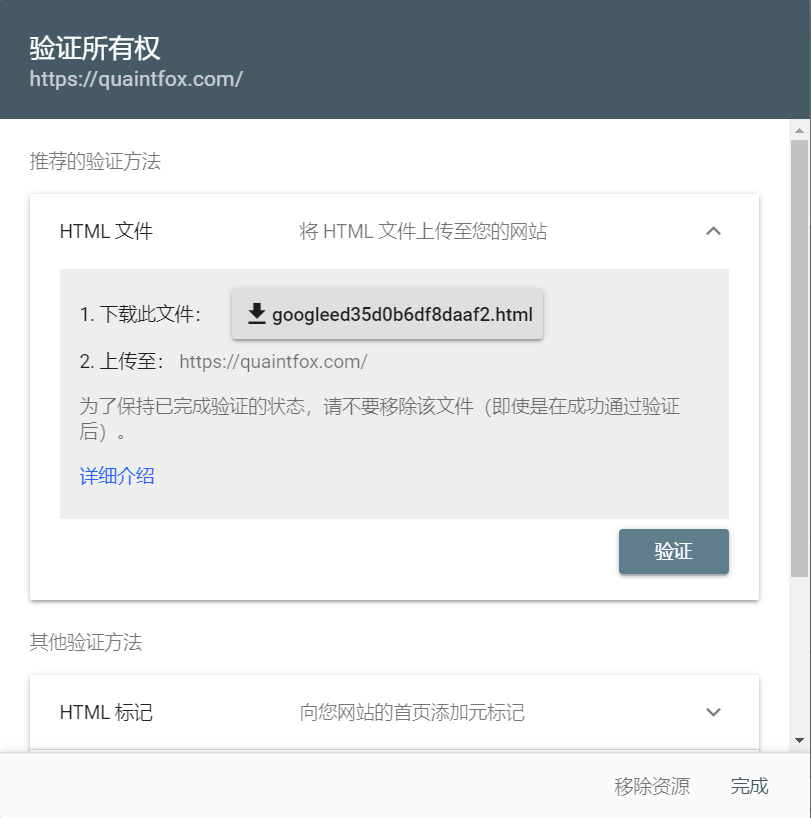
验证
进入 Google Search Console ,选择网址前缀 ,输入网址时记得加上https://
选择 HTML 标记
你会得到元标记<meta name="google-site-verification" content="xxxxxxxx" />,将 content 后的内容加入到主题配置文件中
1 google_site_verification: "xxxxxxxx"
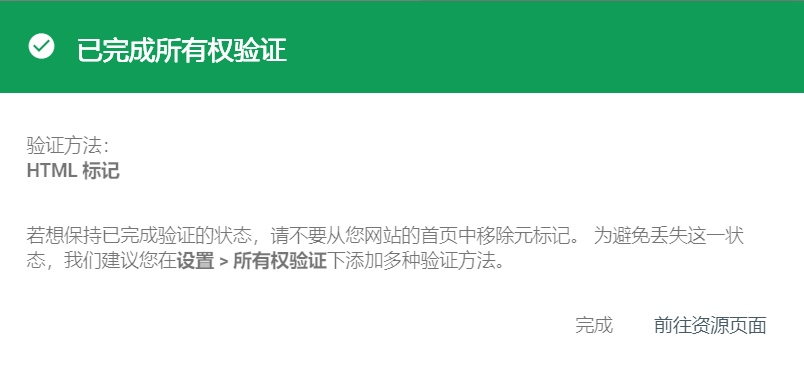
执行
1 hexo cl && hexo g && hexo d
点击前往资源页面
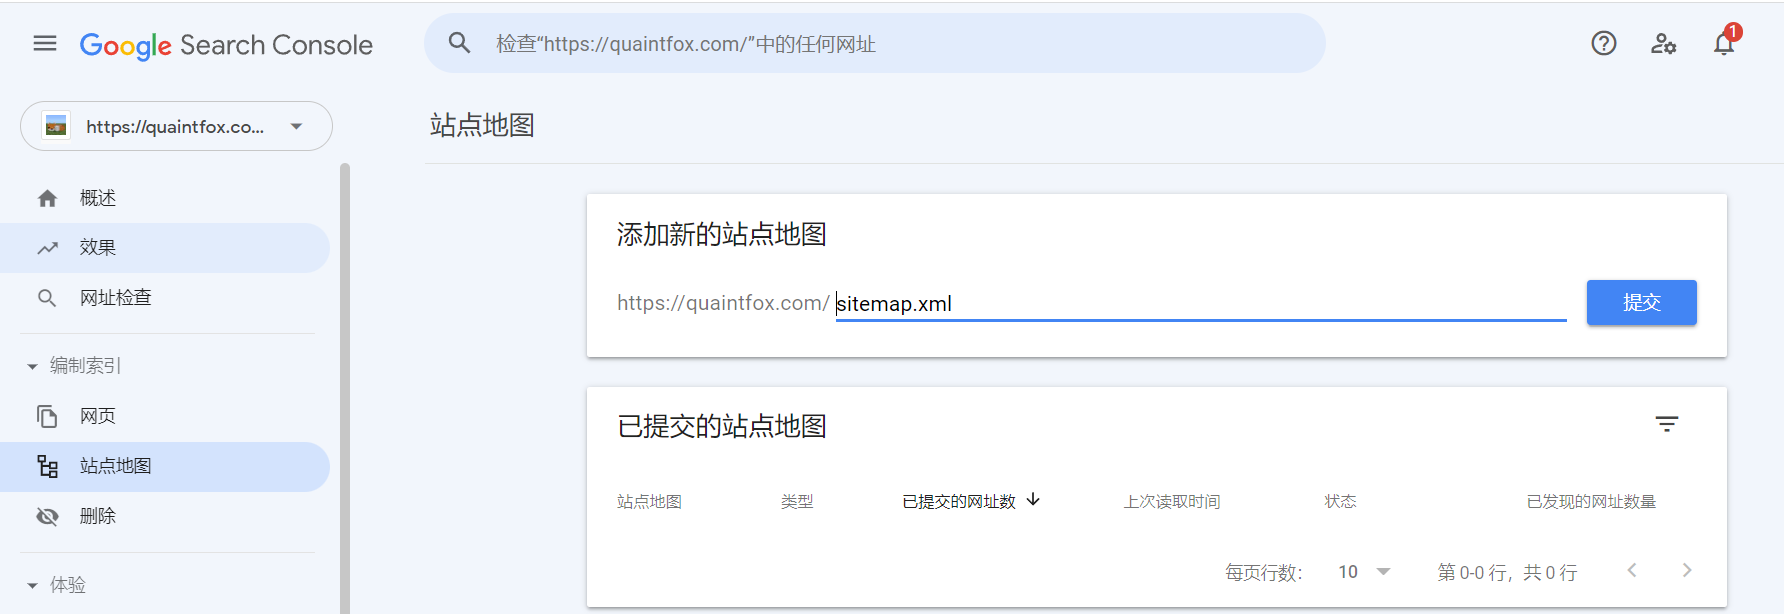
添加站点地图
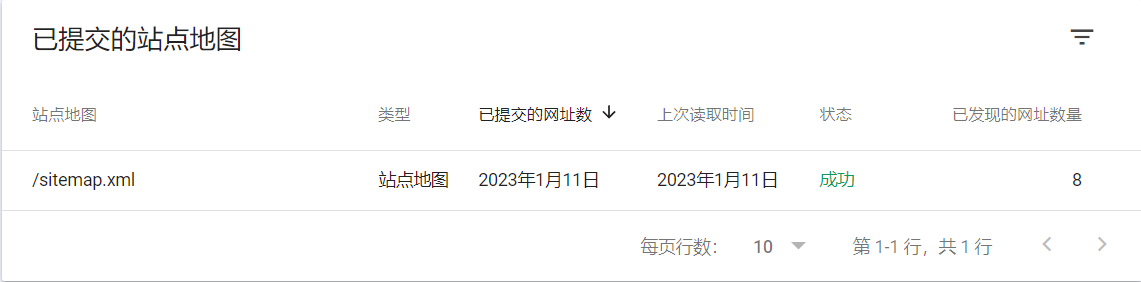
成功提交
静态资源压缩
安装 hexo-neat
1 npm install hexo-neat --save
主题配置文件添加配置
1 2 3 4 5 6 7 8 9 10 11 12 13 14 15 16 17 18 neat_enable: true neat_html: enable: true exclude: neat_css: enable: true exclude: - '**/*.min.css' neat_js: enable: true mangle: true output: compress: exclude: - '**/*.min.js'
自定义 CSS
在/blog/source/_data文件夹下新建styles.styl并编辑
1 2 3 4 5 6 7 8 9 10 11 12 13 14 15 16 17 18 19 20 21 22 23 24 25 26 27 28 29 30 31 32 33 34 35 36 37 38 39 40 41 42 43 44 45 46 47 48 49 50 51 :root { --content-bg-color : rgb (0 0 0 / 0% ); --text-color : #000 ; --waline-theme-color : #222 !important; --waline-color : #000 !important; --waline-bgcolor : rgb (0 0 0 / 0% ) !important; --waline-bgcolor-light : rgb (0 0 0 / 0% ) !important; } .main-inner .sub-menu , .main-inner .post-block , .main-inner .tabs-comment , .main-inner > .comments , .main-inner .comment-position .comments , .main-inner .pagination { border-radius : 5px ; } .header { border-radius : 5px ; } .sidebar-inner { border-radius : 5px ; } .main-inner .tabs-comment , .main-inner > .comments , .main-inner .comment-position .comments , .main-inner .pagination { border-radius : 5px ; } .main-inner .post-block :not (:first-child):not (:first-child) { border-radius : 5px ; } .darkmode--activated { --content-bg-color : rgb (0 0 0 / 0% ) !important; --waline-theme-color : #999 !important; --waline-color : #ccc !important; } .posts-expand .post-title-link { color : var (--text-color); } .posts-expand .post-header { margin-bottom : 0px ; } .post-button { margin-top : 0px ; text-align : right; } p { margin : 0 0 0px ; } .post-block , .comments { padding : 15px ; } .posts-expand .post-title { font-size : 1.2em ; font-weight : bold; } .post-tags a { display : contents; }
修改主题配置文件
1 2 custom_file_path: style: source/_data/styles.styl
文章页眉显示标签
在blog/source/_data文件夹下新建post-meta.njk并编辑
1 2 3 4 5 6 7 8 9 10 <span class ="post-meta-item" > {%- if post.tags and post.tags .length %} {%- set tag_indicate = '<i class="fa fa-tag"></i>' if theme.tag_icon else '#' %} <span class ="post-tags" > {%- for tag in post.tags .toArray () %} <a href="{{ url_for(tag.path) }}" rel="tag" >{{ tag_indicate }} {{ tag.name }}</a> {%- endfor %} </span> {%- endif %} </span>
修改主题配置文件
1 2 custom_file_path: postMeta: source/_data/post-meta.njk